极路由中有一个很好的插件叫做迅雷远程下载,但是最近迅雷官方停止了第三方使用远程下载的功能,于是萌发了自己搭建下载平台的想法。
aria2其实也是一个很好的选择,但是今天要介绍的是另一个使用更为简单的Cloud Torrent
Cloud Torrent是一个由Go(golang)撰写的自主托管远程torrent客户端。您远程启动torrent,它们作为服务器本地磁盘上的一组文件下载,然后通过HTTP可检索或流式传输。
特征
- 支持 单一二进制文件运行
- 支持 BT下载
- 支持 磁力链接下载
- 支持 搜索磁力链接
- 可视化友好界面(移动端也友好)
- 实时更新下载状态
- 跨平台
安装 我这里偷懒直接选择二进制文件直接使用啦,Docker或者自行编译参照官方文档进行吧~
curl https://i.jpillora.com/cloud-torrent! | bash
脚本是这样的:
#!/bin/bash
TMP_DIR="/tmp/tmpinstalldir"
function cleanup {
	echo rm -rf $TMP_DIR > /dev/null
}
function fail {
	cleanup
	msg=$1
	echo "============"
	echo "Error: $msg" 1>&2
	exit 1
}
function install {
	#settings
	USER="jpillora"
	PROG="cloud-torrent"
	MOVE="false"
	RELEASE="0.8.20"
	INSECURE="false"
	OUT_DIR="$(pwd)"
	GH="https://github.com"
	#bash check
	[ ! "$BASH_VERSION" ] && fail "Please use bash instead"
	[ ! -d $OUT_DIR ] && fail "output directory missing: $OUT_DIR"
	#dependency check, assume we are a standard POISX machine
	which find > /dev/null || fail "find not installed"
	which xargs > /dev/null || fail "xargs not installed"
	which sort > /dev/null || fail "sort not installed"
	which tail > /dev/null || fail "tail not installed"
	which cut > /dev/null || fail "cut not installed"
	which du > /dev/null || fail "du not installed"
	GET=""
	if which curl > /dev/null; then
		GET="curl"
		if [[ $INSECURE = "true" ]]; then GET="$GET --insecure"; fi
		GET="$GET --fail -# -L"
	elif which wget > /dev/null; then
		GET="wget"
		if [[ $INSECURE = "true" ]]; then GET="$GET --no-check-certificate"; fi
		GET="$GET -qO-"
	else
		fail "neither wget/curl are installed"
	fi
	#find OS #TODO BSDs and other posixs
	case `uname -s` in
	Darwin) OS="darwin";;
	Linux) OS="linux";;
	*) fail "unknown os: $(uname -s)";;
	esac
	#find ARCH
	if uname -m | grep 64 > /dev/null; then
		ARCH="amd64"
	elif uname -m | grep arm > /dev/null; then
		ARCH="arm"
	elif uname -m | grep 386 > /dev/null; then
		ARCH="386"
	else
		fail "unknown arch: $(uname -m)"
	fi
	#choose from asset list
	URL=""
	FTYPE=""
	case "${OS}_${ARCH}" in
	"darwin_386")
		URL="https://github.com/jpillora/cloud-torrent/releases/download/0.8.20/cloud-torrent_darwin_386.gz"
		FTYPE=".gz"
		;;
	"darwin_amd64")
		URL="https://github.com/jpillora/cloud-torrent/releases/download/0.8.20/cloud-torrent_darwin_amd64.gz"
		FTYPE=".gz"
		;;
	"linux_386")
		URL="https://github.com/jpillora/cloud-torrent/releases/download/0.8.20/cloud-torrent_linux_386.gz"
		FTYPE=".gz"
		;;
	"linux_amd64")
		URL="https://github.com/jpillora/cloud-torrent/releases/download/0.8.20/cloud-torrent_linux_amd64.gz"
		FTYPE=".gz"
		;;
	"linux_arm")
		URL="https://github.com/jpillora/cloud-torrent/releases/download/0.8.20/cloud-torrent_linux_arm.gz"
		FTYPE=".gz"
		;;
	*) fail "No asset for platform ${OS}-${ARCH}";;
	esac
	#got URL! download it...
	echo "Downloading $USER/$PROG $RELEASE ($URL)..."
	#enter tempdir
	mkdir -p $TMP_DIR
	cd $TMP_DIR
	if [[ $FTYPE = ".gz" ]]; then
		which gzip > /dev/null || fail "gzip is not installed"
		#gzipped binary
		NAME="${PROG}_${OS}_${ARCH}.gz"
		GZURL="$GH/releases/download/$RELEASE/$NAME"
		#gz download!
		bash -c "$GET $URL" | gzip -d - > $PROG || fail "download failed"
	elif [[ $FTYPE = ".tar.gz" ]]; then
		#check if archiver progs installed
		which tar > /dev/null || fail "tar is not installed"
		which gzip > /dev/null || fail "gzip is not installed"
		bash -c "$GET $URL" | tar zxf - || fail "download failed"
	elif [[ $FTYPE = ".zip" ]]; then
		which unzip > /dev/null || fail "unzip is not installed"
		bash -c "$GET $URL" > tmp.zip || fail "download failed"
		unzip -o -qq tmp.zip || fail "unzip failed"
		rm tmp.zip || fail "cleanup failed"
	elif [[ $FTYPE = "" ]]; then
		bash -c "$GET $URL" > "cloud-torrent_${OS}_${ARCH}" || fail "download failed"
	else
		fail "unknown file type: $FTYPE"
	fi
	#search subtree largest file (bin)
	TMP_BIN=$(find . -type f | xargs du | sort -n | tail -n 1 | cut -f 2)
	if [ ! -f "$TMP_BIN" ]; then
		fail "could not find downloaded binary"
	fi
	#ensure its larger than 2MB
	if [[ $(du -m $TMP_BIN | cut -f1) -lt 2 ]]; then
		fail "resulting file is smaller than 2MB, not a go binary"
	fi
	#move into PATH or cwd
	chmod +x $TMP_BIN || fail "chmod +x failed"
	mv $TMP_BIN $OUT_DIR/$PROG || fail "mv failed" #FINAL STEP!
	echo "Downloaded to $OUT_DIR/$PROG"
	#done
	cleanup
}
install
我使用的是树莓派的pi用户,执行后是没有正常的执行上面的脚本的。
不过也没关系,我在/tmp/tmpinstalldir找到了cloud-torrent并把它剪切到我要放置的地方了。
运行
前期准备工作,我在cloud-torrent同级目录建立了
log文件夹 用来存放日志
downloads文件夹 用来存放下载文件
mkdir ./log
touch ./log/cloud-torrent.log
然后使用帮助命令看怎么使用Cloud Torrent吧
./cloud-torrent /?
Options:
  --title, -t        Title of this instance (default Cloud Torrent, env TITLE)
  --port, -p         Listening port (default 3000, env PORT)
  --host, -h         Listening interface (default all)
  --auth, -a         Optional basic auth in form 'user:password' (env AUTH)
  --config-path, -c  Configuration file path (default cloud-torrent.json)
  --key-path, -k     TLS Key file path
  --cert-path, -r    TLS Certicate file path
  --log, -l          Enable request logging
  --open, -o         Open now with your default browser
  --help
  --version, -v
好了,然后运行
./cloud-torrent -t 远程下载 -p 2333 -h 0.0.0.0 -a kay:kay -c ./cloud-torrent.json -l >>./log/cloud-torrent.log
或者写成bash文件,让pm2守护运行啦。
#!/bin/bash/
./cloud-torrent -t 远程下载 -p 2333 -h 0.0.0.0 -a kay:kay -c ./cloud-torrent.json -l >>./log/cloud-torrent.log
PM2守护
pm2 start cloud-torrent.sh
配置文件说明
上面提供启动服务的需要使用到一个配置文件。
配置内容如下,这个配置会自动生成。
{
  "AutoStart": true, #自动启动下载
  "DisableEncryption": false,  #禁用加密
  "DownloadDirectory": "/home/pi/Downloads/xiazai/downloads", #文件下载到的目录
  "EnableUpload": false,  #是否上传
  "EnableSeeding": false, #是否启用种子
  "IncomingPort": 50007 #上行端口
}
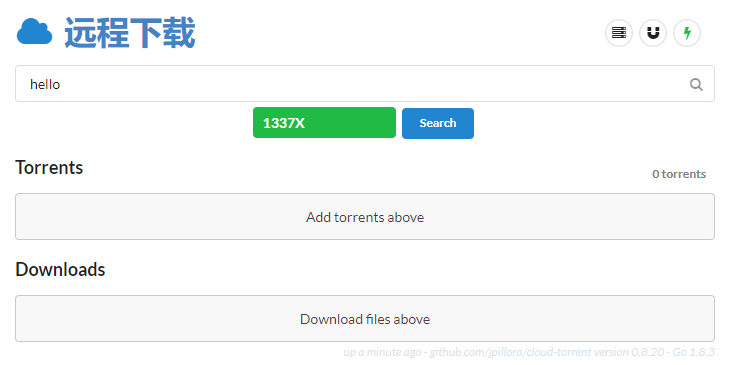
搜索下载
随便选择一个源搜索看看,顺便测试下载:
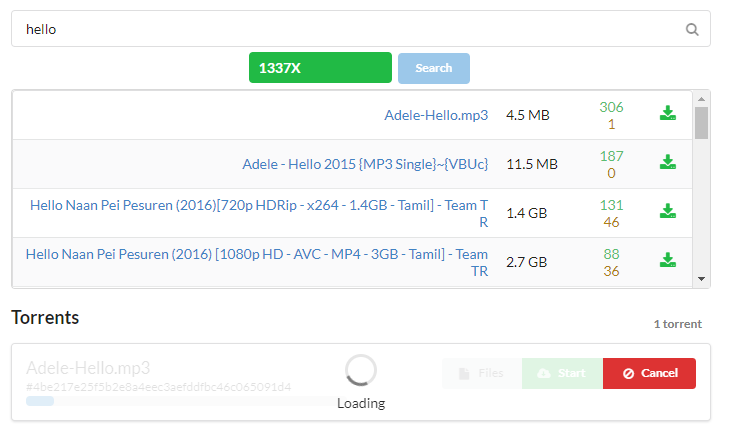
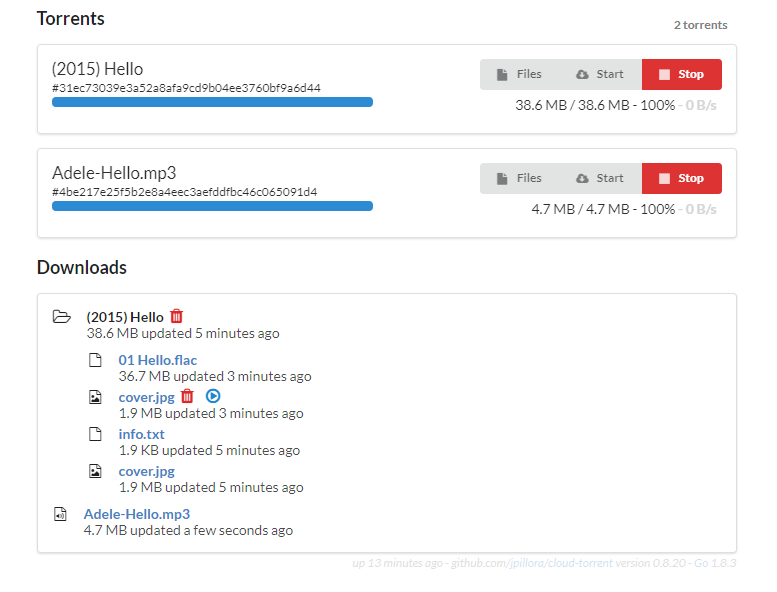
这样就好了,对于mp3格式文件,还支持在线播放。
好了,又水了一篇。